Generating Parameter Sensitvities
This tutorial will demonstrate how to generate geometric parameter sensitivities using HyperVehicle.
See also
This example follows on from the sharp wedge tutorial.
Workflow
Nominal Geometry
First, create the nominal geometry configuration. For this example, we will be using the sharp wedge geometry constructed previously.
Parametric Geometry Generator
The next step is to refactor the geometry generation code into a
ParametricGenerator object. This object inherits from the
Generator object. This class has two methods:
the Generator.__init__() method,
where all geometric parameters are passed as arguments, and the
create_instance() method, which returns a
Vehicle object ready to be generate()’d.
The code below provides an example of this class. Note that the
named kwargs are passed to super().__init__ to be unpacked
and overwrite the default parameters. See Generator
for more details.
from hypervehicle import Vehicle
from hypervehicle.components import Fuselage
from hypervehicle.generator import Generator
from hypervehicle.geometry import Vector3, Line, CoonsPatch


class ParametricWedge(Generator):
    def __init__(self, **kwargs) -> None:
        # Wedge parameters
        self.wingspan = 1
        self.chord = 1
        self.thickness = 0.1

        # Complete instantiation
        super().__init__(**kwargs)

    def create_instance(self) -> Vehicle:
        # Create vehicle object
        wedge = Vehicle()
        wedge.configure(name="Wedge", verbosity=1)

        # Define wedge cross-section points
        #                   ^ +y
        #                   |
        #            W    _ - _   N        ___
        #            _ -    |   - _         |
        #  +x <--- < -------------- >       | thickness
        #            - _    |   _ -         |
        #            S   -  _ -     E      ___
        #
        #          |-----------------|
        #                wingspan

        NW = Vector3(x=0, y=0.5 * self.thickness)
        NE = Vector3(
            x=-0.5 * self.chord,
            y=0,
        )
        SE = Vector3(x=0, y=-0.5 * self.thickness)
        SW = Vector3(x=0.5 * self.chord, y=0)

        # Define patches forming wedge
        sections = []
        for i in [-1, 1]:
            z_loc = 0.5 * i * self.wingspan
            axial_shift = Vector3(x=0, y=0, z=z_loc)

            N = Line(p0=NW + axial_shift, p1=NE + axial_shift)
            S = Line(p0=SW + axial_shift, p1=SE + axial_shift)
            E = Line(p0=SE + axial_shift, p1=NE + axial_shift)
            W = Line(p0=SW + axial_shift, p1=NW + axial_shift)

            patch = CoonsPatch(north=N, south=S, east=E, west=W)
            sections.append(patch)

        fuselage = Fuselage(
            cross_sections=sections,
            sweep_axis="z",
            stl_resolution=10,
        )
        wedge.add_component(fuselage)

        # Generate STL
        return wedge
Note that the nominal geometry could be generated using the generator object as well:
parametric_wedge_generator = ParametricWedge()
wedge = parametric_wedge_generator.create_instance()
wedge.generate()
This is a good check to ensure that the generator has been correctly implemented.
Run the Sensitivity Study
With the steps above completed, you can run a sensitivity study
by creating an instance of SensitivityStudy.
Then, define the design parameters which you would like to get
sensitivities to. In this example, we are extracting the geometric
sensitivities to each wedge parameter: the thickness, the chord
and the wingspan. We specify this with the parameters dictionary,
passing along the nominal values to perturb about.
Finally, run the study by calling the dvdp() method, passing in
the design parameters.
from hypervehicle.utilities import SensitivityStudy

# Construct sensitivity study
ss = SensitivityStudy(ParametricWedge)

# Define parameters to get sensitivities to
parameters = {'thickness': 0.1, 'chord': 1, 'wingspan': 1}

# Perform study
sensitivities = ss.dvdp(parameters)

# Save to CSV
ss.to_csv()
The output of dvdp is a nested dictionary, containing
pandas DataFrames for each parameter and component of the
Vehicle object.
You can also save the results of the study using the to_csv
method. This will create a unique file for each component.
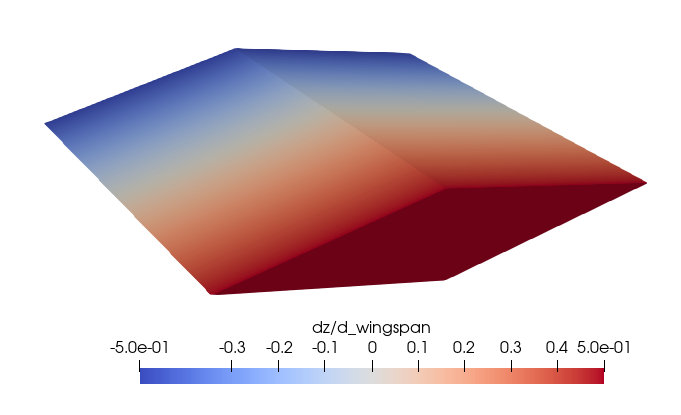
Visualisation of Sensitivities
The .csv files can be opened in ParaView. After opening the file,
select Table to Points (set x, y and z columns before applying),
then Delaunay 3D filter.